I'm having people over for dinner tonight. I need something quick and easy because after working the whole day and trying to squeeze in a spin class, I'm going to have all of about 15 minutes to make dinner.
Enter fish. Namely, tilapia. It only needs to marinate for a few minutes, cooks quickly, and tastes delicious. I know this because I tested this recipe last week and it was damn good. Then I posted a picture of it on Facebook and told my friends that's what they were having.
That's what happens when you invite yourself to dinner in the G+F house. You get what I want to eat.
It's the simplest recipe and I'm sure works well with any white-fleshed fish. The marinade permeates completely, leaving a sweet, tangy, and flaky filet. Add a side of sautéed greens and a some roasted cauliflower: it's a gourmet meal.
In less time than it'll take to finish the first round of beers.
Honey, soy sauce, balsamic vinegar in equal measure, and a garlic clove. 25 minutes in the marinade, 15-20 minutes at 350 degrees, and that's it.
Really.
Easy peasy.
Pages
▼
Tuesday, April 24, 2012
Thursday, April 19, 2012
Chopped-Style Meal
About a month ago, I got the urge to host another Chopped dinner. Unfortunately I knew I wasn't going to be home much to actually host four people at my house (case in point, it's taken a month to actually make the meal). Instead I asked the Facebook fans to suggest four ingredients that I would then use to make myself dinner one of these days.
They did not go easy on me.
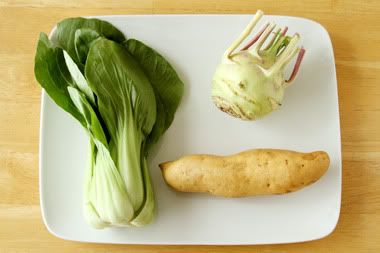
The winning ingredients were sweet potato, truffle oil, bok choy, and kohlrabi (winning = first four people to respond). Except for the truffle oil, none of those ingredients had ever seen the inside of my kitchen. I've eaten sweet potato and bok choy, sure...but what the hell is kohlrabi???
I had no idea what to do.
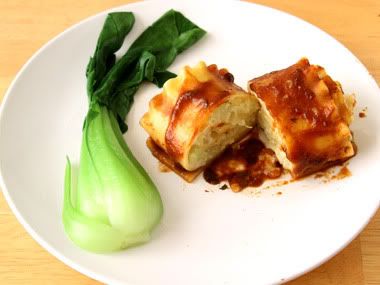
After a month of contemplating (and learning all the different ways to use that weird turnip-looking vegetable up there on the upper right corner of the plate) I decided to roast everything, stuff them into lasagna rolls, and drizzle with truffle oil. Because all vegetables taste better roasted. In pasta. With truffle oil.
(Yes, roasting is a bit of a cop out. So what? I had to make it tasty so I'd actually eat it.)
Off I went to shop. The fancy-schmancy organic produce store didn't have kohlrabi, but the cheap produce store did (weird). And the sweet potatoes were next to the yams—they're not the same thing.
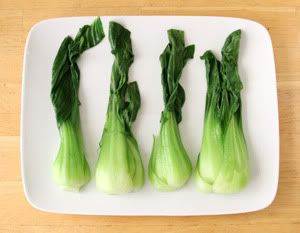
But when I got back home, I couldn't bring myself to roast the beautiful baby bok choy. Sure, that's a thing you can do, but they were so fresh, I opted to blanch them to retain the color.
Lessons learned: the kohlrabi took much longer to roast than the sweet potatoes. But since I mixed them together on the same pan, I couldn't separate them out. Note for next time. Also, kohlrabi is not my favorite vegetable. Even roasted it wasn't yummy. However, it did add a bit of texture to the roll-ups. Two of each of the veggies made enough for 6 pasta rolls and a LOT of leftover stuffing. I ended up serving this to two different people (like I'm going to eat 6 of those by myself, that's suicide by carbs!), both of whom claimed to like it. I think they were just being nice.
The verdict: I probably won't be making it again. I appreciate the G+F fans' tripping me up with unusual ingredients. And for the education I received regarding kohlrabi. But I really didn't care for it. However, it was fun to try something completely new. Maybe this will become a monthly experiment!
If you want to try your hand at it, enjoy the recipe!
They did not go easy on me.
The winning ingredients were sweet potato, truffle oil, bok choy, and kohlrabi (winning = first four people to respond). Except for the truffle oil, none of those ingredients had ever seen the inside of my kitchen. I've eaten sweet potato and bok choy, sure...but what the hell is kohlrabi???
I had no idea what to do.
After a month of contemplating (and learning all the different ways to use that weird turnip-looking vegetable up there on the upper right corner of the plate) I decided to roast everything, stuff them into lasagna rolls, and drizzle with truffle oil. Because all vegetables taste better roasted. In pasta. With truffle oil.
(Yes, roasting is a bit of a cop out. So what? I had to make it tasty so I'd actually eat it.)
Off I went to shop. The fancy-schmancy organic produce store didn't have kohlrabi, but the cheap produce store did (weird). And the sweet potatoes were next to the yams—they're not the same thing.
White-fleshed sweet potatoes are on the left and the yams are on the right.
But when I got back home, I couldn't bring myself to roast the beautiful baby bok choy. Sure, that's a thing you can do, but they were so fresh, I opted to blanch them to retain the color.
So pretty.
I needed a sauce for this, and realized I didn't have anything resembling pasta sauce in the house. I had even planned to make a pineapple truffle oil topping...but somehow completely forgot about my favorite ingredient in my last minute panic. I would have been "chopped" for sure had this been a real competition. I improvised with some tomato paste and chipotle. Spicy!
The final dish:
Lessons learned: the kohlrabi took much longer to roast than the sweet potatoes. But since I mixed them together on the same pan, I couldn't separate them out. Note for next time. Also, kohlrabi is not my favorite vegetable. Even roasted it wasn't yummy. However, it did add a bit of texture to the roll-ups. Two of each of the veggies made enough for 6 pasta rolls and a LOT of leftover stuffing. I ended up serving this to two different people (like I'm going to eat 6 of those by myself, that's suicide by carbs!), both of whom claimed to like it. I think they were just being nice.
The verdict: I probably won't be making it again. I appreciate the G+F fans' tripping me up with unusual ingredients. And for the education I received regarding kohlrabi. But I really didn't care for it. However, it was fun to try something completely new. Maybe this will become a monthly experiment!
If you want to try your hand at it, enjoy the recipe!
print recipe

Roasted Sweet Potato & Kohlrabi Lasagna Rolls
by Paulette Fontanez April-19-2012
Roast the vegetables, roll into pasta, and enjoy.
Ingredients
- 2 tablespoons olive oil
- 2 medium sweet potatoes (white flesh variety)
- 2 medium kohlrabies
- 12 strips of lasagna noodles, cooked and drained
- 1 cup ricotta cheese
- 1 egg, lightly beaten
- 1 can tomato sauce, or any sauce you like (chunky salsa might spice it up nicely)
Instructions
1. Preheat the oven to 400°F. Chop the vegetables into 1-inch chunks, drizzle with olive oil, and roast for about 30 minutes or until just beginning to brown. (The kohlrabi might take longer, so you may want to use 2 pans.) Allow to cool a bit. Leave the oven on.2. Mix the vegetables with the cheese and egg until well combined.3. Evenly spread each noodle with 2-3 tablespoons of the mixture and roll up, starting at the short end.4. Place roll-ups in baking dish, top with your choice of sauce, and bake for 30-40 minutes.
Details
Prep time: Cook time: Total time: Yield: 12 rollsTuesday, April 17, 2012
Adventures in Cheesemaking: Mozzarella
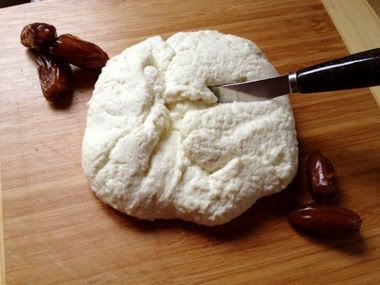
I'M A CHEESEMAKER!! Yes, I made the cheese in that picture. That delicious, mozzarella cheese. With my own two hands.
And yes, I write about cheese a lot. I love cheese! At least I can admit to my addiction. Especially goat cheese. Mmmmm.
If I only had a goat to keep at home, I'd never have to buy cheese again. But I don't have room, or the desire to tend to a farm animal, so I buy the milk and make what I can.
I've done this before with paneer, which is a near-identical process to making ricotta. True, you make them with cow's milk and not goat's milk, but I take what I can get.
And when I found this incredible step-by-step picture tutorial, I couldn't wait to make mozzarella.
All you need is a gallon of milk, citric acid, liquid rennet, and salt. I found both the acid and rennet at Full O' Life in Burbank (and also ran into Heather Sinn from Ink Master, which was...strange) for about $15 total (and only used a teeny bit of each). So for a grand total of approximately $4, I made about a pound of fresh mozzarella.
It took a little longer than 30 minutes to make, but far less than 30 minutes to devour.
The tutorial is truly awesome, but after going through the process, I have a few suggestions:
- Do NOT forget the gloves. I did it with bare hands and HOT DAMN. There was much cursing.
- Using a two-piece pasta cooker, the kind with a removable insert, would prove helpful when trying to drain the whey. It's easier to lift the curds out than scoop them up with a slotted spoon.
- Double the recipe. That cheese disappears quickly!
- Eat it all. Don't share. It's really that good.
- Don't blame me when you get fat on homemade cheese. I'm just the messenger.
- Do it now. Don't wait. You can have fresh hot cheese within the hour! What are you waiting for?
Thursday, April 12, 2012
Crustless Smoked Oyster & Silver Beet Quiche
 Know what a silver beet is? It sounds magical, but really it's what Swiss chard is called in Australia (in Germany it's mangold). Know what the difference between Swiss chard and regular chard is? According to Wikipedia: nothing. We just like to call the same things different words.
A quick email to my Australian friend confirmed they are indeed the same thing, though she added, "People commonly think silver beet is spinach. But it’s not."
So it's NOT spinach, got that? Back to our friendly internet resource, Wikipedia claims the "Swiss" part was added precisely to differentiate the greens from French spinach in 19th century seed catalogs. That was back before the internet could help sort it all out. You had to eat it, and if your teeth felt fuzzy, you knew it was spinach.
Swiss chard, mangold, regular chard, spinach...I'll call it silver beet because that sounds neato. And also because I like chard but I hate beets, so hopefully this will help me get over my aversion.
Silver beets. Yum.
My silver beets didn't have red stalks. How do you tell the difference between red chard and just plain rhubarb? Rhubarb is a fruit used in pies and red chard is like spinach with red veins. There you go.
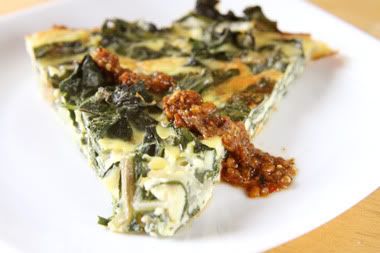
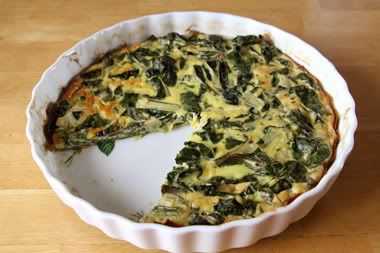
This began as a simple spinach quiche. I used to make it a lot back in the day before I actually knew how to "cook." Instead of the cheddar I would normally use, I threw in the leftover smoked oyster dip from last week and voila! More protein. With the superfood chard, eggs, and oysters, this is probably the most protein-charged meal I've made recently. Or ever.
Probably ever.
Since the cheese in the dip is so very salty/sour, the taste is quite different from a regular quiche. It's also more oyster-y. But it's good for you. Might turn you into a super-hero.*
Douse this with some salsa colorada and say ahhh!
*claim unproven
print recipe

Crustless Smoked Oyster & Silver Beet Quiche
by Paulette Fontanez April-12-2012
A fusion of a smoked oyster dip and spinach-like chard in an eggy pie.
Ingredients
- 1 tablespoon olive oil
- 1 onion, chopped
- 2 cups silver beet leaves
- 4 eggs, beaten
- 1 to 1 1/2 cups smoked oyster dip
Instructions
1. Preheat the oven to 350 degrees and lightly grease a 9-inch pie pan.2. Heat oil in a skillet over medium heat. Sauté the onions until they are soft, just before they start to brown. Then stir in silver beet and continue cooking until bright green. Remove from heat.3. In a bowl, combine the eggs with the smoked oyster dip. Add the silver beet/onion mixture and ensure it's evenly mixed together. Spread mixture into greased pie pan, evenly.4. Bake until top is slightly brown, about 30-40 minutes. Eggs should be set and a toothpick comes out clean. Serve warm.
Details
Prep time: Cook time: Total time: Yields: 1 9" pieTuesday, April 10, 2012
Bacon Whiskey Milkshake
This experiment started just before St. Patrick's Day, when I found a home recipe for the infamous McDonald's Shamrock Shake. I made it, switching out Oreos for Thin Mints (it was Girl Scout cookie season, after all). Then I drank it and immediately remembered that I don't like Thin Mints, or mint chocolate chip ice cream. But I do like whiskey.
And bacon.
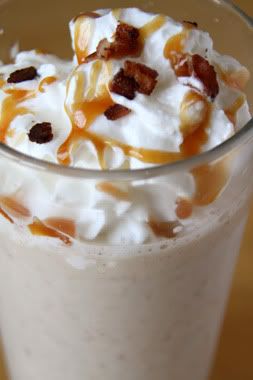
So I tried again, this time adding a whiskey caramel sauce. A bacon-infused whiskey caramel sauce.
Because there is ALWAYS bacon scotch on hand in this house...until there wasn't! Turns out I'd used it all in the doomed Thin Mint Shake and hadn't replaced it. So I ran to the store for some good ol' fashioned Kentucky bourbon and made me up some more.
And decided that, while I was at it, might as well switch up the ice cream from plain vanilla to something less bland. Something like pralines and cream ice cream. Because pralines and bourbon marry so nicely. They're both southern comforts.
And got it right. So very right. The whiskey caramel recipe came from Hispanic Kitchen. I'm going to need to try the Coconut Upside Down Cake it's paired with. Mmm, coconut. Also, whiskey + bacon + caramel = mmmm.
The whole recipe yields about 4 large/6 smaller shakes. But if you want to make a single serving, simply take two large scoops of ice cream mixed with 1-4 ounces of milk (depending how thick you want it) and add a shot of whiskey. Drink.
If you're making this for kids, simply omit the whiskey and make up the missing liquid in milk. Simple virgin milkshakes! That you can still top with whipped cream and bacon.
print recipe
Play with the ratio of milk to whiskey depending on how thick you like your shakes. For super potent shakes, omit the milk and use a 1/2 cup of whiskey instead.
Yield: 4-6 servings

Bacon Whiskey Milkshake
by Paulette Fontanez April-10-2012
Play with the ratio of milk to whiskey depending on how thick you like your shakes. For super potent shakes, omit the milk and use a 1/2 cup of whiskey instead.
Ingredients
- 1 48-ounce container of pralines & cream ice cream
- 1/4 cup bacon-infused whiskey
- 1/4 cup milk
- whipped cream
- whiskey caramel sauce
- crumbled bacon
Instructions
1. Blend the ice cream and whiskey/milk together until smooth.2. Pour into glasses, topping with whipped cream, caramel sauce and crumbled bacon.
Thursday, April 5, 2012
Roasted Garlic & Butternut Squash Ginger Soup
There's little I love more than roasted garlic. I can eat it straight out of the oven, burning my tongue because I'm so impatient. So when I had a butternut squash to cook, and I found A Bushel of What's roasted squash soup with roasted garlic, I knew that was what I'd be making. It's roasty goodness all together.
The picture on that page alone was enough to make me salivate. I wish I'd taken it. Mmm, roastiness.
Roasted vegetables are usually a cool weather comfort food. But the weather in Los Angeles has been really strange. We've had spring-like temps all winter, and then really cold rains as spring finally approaches. Roasted vegetables are perfect for those weird days.
Roasted vegetables are usually a cool weather comfort food. But the weather in Los Angeles has been really strange. We've had spring-like temps all winter, and then really cold rains as spring finally approaches. Roasted vegetables are perfect for those weird days.
And while the pictures on Nicole's site are beautiful, I didn't really follow her recipe. I wanted my roasted squash and garlic mixed together, but I also wanted something else. Something zingy.
Looking around my kitchen for inspiration, I spied the candied ginger. And then it all came together. Adding freshly zested ginger gave a nice bite to it. Exactly what my roasted concoction needed.
Later, when shooting the pictures, the soup-scape was a bit too bland (yes, I did just make up the word "soup-scape"). That's when the candied ginger came back into play for its cameo. And then I began dipping it in the soup like it was a party dip. And couldn't stop. The sweet butternut squash and peppery candied ginger came together so nicely.
If fresh ginger isn't available, add a tablespoon or so of powdered ginger. Either way, it brought a nice zing to the soup.
And to your mouth. Mmmm, zingy!
print recipe
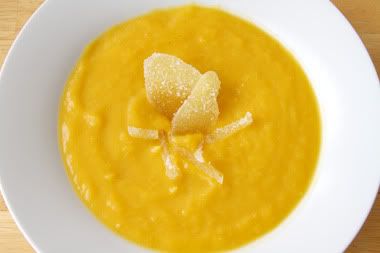

Roasted Garlic & Butternut Squash Ginger Soup
by Paulette Fontanez April-10-2012
Roasted vegetables make a savory soup, the addition of ginger adds a nice zip!
Ingredients
- 3 tablespoons olive oil, divided
- 1 medium butternut squash
- 1 whole head of garlic
- 1 large shallot, or 2 small, chopped
- 1 tablespoon minced fresh ginger (about 1 inch)
- 3 cups vegetable or chicken stock (depending on your preference)
- salt & pepper, to taste
Instructions
1. Preheat the oven to 375 degreees. Cut the squash in half and scoop out the seeds. Drizzle each half with about one tablespoon of oil each. Lie face down on a lined baking sheet.2. Peel away the outer layers of the garlic skin, leaving the skins of the individual cloves intact. Slice the top 1/2 inch of the head to expose the individual cloves. Place in foil, drizzle with just a bit of olive oil on the garlic and wrap the foil around the head. Place on the baking sheet with the squash. 3. Bake both the squash and garlic together for about 45-60 minutes. When the squash skin begins to wrinkle and the edges brown, they're done (and so is the garlic, most likely). Allow to cool.4. Heat the remaining oil in a pan and sauté the shallots and ginger zest over medium heat until the shallots are softened and just beginning to take on color. Remove from heat.5. Once the squash has cooled, remove the skin (should come off fairly easily) and cube. Squeeze the garlic cloves out of the bulb. Put the squash, garlic, and sautéed ginger and shallots in a blender with about 2 cups of stock (do this in batches if necessary, or use an immersion blender). Add more or less stock if you prefer a thin or thick soup.6. Warm soup in a pot if necessary and add salt and pepper to taste. Garnish with your favorite topping (cream or candied ginger are two excellent options) and serve hot or cold. This is even tastier the next day, after the flavors have married overnight.
Details
Prep time: Cook time: Total time: Yield: About 6 cupsTuesday, April 3, 2012
Smoked Oyster Dip
I've learned that I like smoked oysters. A couple of ways. This experiment started as a smoked oyster pâté. I was working on a cross between the recipes from Food52 and Joseph Phelps Vineyard, both of which use cream cheese.
But I decided to use a super strong Egyptian Istanbolli cheese my mother found was too salty for her, so she pawned it off on me. As soon as I tasted it, I knew I would use it in this dish.
The feta-like cheese was so strong I cut back on the salt and lemon. I also only used half of the Worcestershire sauce because of its high sodium content. Switching out parsley for oregano (I never have parsley on hand, but I always have oregano — must be the Latina in me), adding more garlic, and foregoing the lemon zest completely led to a tasty combination. I almost wish I'd left out the Tabasco, it really doesn't add much more than a sour vinegar-y flavor. My other mistake was in using all three tablespoons of milk at once. Given the oil from the smoked oysters (though drained), there was a bit too much liquid.
Therefore, I made a creamy dip instead of a thick pâté. This would make a great sandwich spread, or bagel schmear.
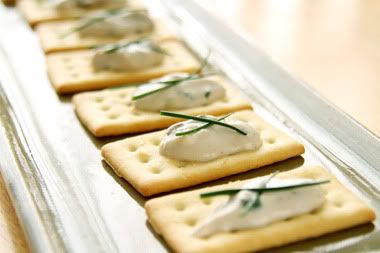
It's good party food. And a perfect vehicle for the fresh chives I recently acquired. I love chives in anything. Even with smoked oysters. They make pretty, edible garnishes.
print recipe
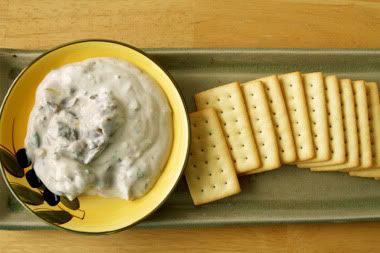

Smoked Oyster Dip
by Paulette Fontanez
A creamy cheese-based dip perfect for parties.
Ingredients
- 8 oz Istanbolli cheese (can substitute cream cheese, feta, goat cheese or even ricotta)
- 2 tablespoons scallions, finely chopped
- 1 tablespoon Worcestershire sauce (to taste)
- 2 cloves garlic, minced
- 2 tablespoons fresh oregano, finely chopped
- 2 tablespoons chives, finely chopped
- 3 tablespoons milk
- 1 three oz can smoked oysters, packed in olive oil
- dash hot sauce, such as Tabasco
- salt & pepper, to taste
Instructions
1. In a bowl, combine the cheese, scallions, garlic, oregano, chives, hot sauce, and Worcestershire sauce.2. Add the milk a bit at a time, until you reach the thickness you prefer. All three tablespoons lead to a very thin dip, less to a thicker pâté-like texture. Remember you might add oil in the next step.3. Add in the oysters, using a bit of the flavorful oil in the mix. Add the salt and pepper at this point, if needed.4. Spread on crackers or bagels, or serve in a dipping bowl.
Details
Yield: 4-6 servings


